3. CPU node에서 R 코드 실행하기
2번 문서의 Step 1, 2, 3을 먼저 숙지하시기 바랍니다. 이 문서는 그 이후의 내용만을 다룹니다.
1. 필요한 R 패키지를 자신의 디렉토리에 설치하기
R은 cpu-compute에만 설치되어 있습니다. R은 conda environment를 사용하지 않으며, R 패키지들은 install.packages를 통해 설치할 때 별도의 옵션을 주지 않으면 user별 directory가 아닌 NAS 내의 공통 폴더에 저장됩니다.
아래의 샘플 코드는 R 패키지를 /mnt/nas/users/mjm/R_packages 라는 디렉토리에 설치합니다.
**install.packages()**에서
-
lib 옵션을 통해 자신의 개인 디렉토리에 패키지를 설치할 수 있습니다. 이 옵션을 사용하지 않으면 사용자 간에 패키지 버전이 충돌할 수 있으므로 이 옵션을 사용하는 것을 강력히 권장합니다.
-
force = FALSE 옵션은 이미 설치된 패키지를 또 설치하는 것을 막아줍니다1.
-
INSTALL_opts = c('–no-lock') 옵션은 설치가 이전에 강제로 중단되어서 directory에 락이 걸렸을 때 락을 무시하고 설치하게 합니다2.
 1
 2
 3
 4
 5
 6
 7
 8
 9
10
11
12
13
14
15
16
17
18
19
20
21
22
23
24
25
26
27
28
29
lib_r_packages = "/mnt/nas/users/mjm/R_packages" install.packages( "WeightSVM", lib = lib_r_packages, dependencies = TRUE, force = FALSE, INSTALL_opts = c('--no-lock') ) install.packages( "e1071", lib = lib_r_packages, dependencies = TRUE, force = FALSE, INSTALL_opts = c('--no-lock') ) install.packages( "mclust", lib = lib_r_packages, dependencies = TRUE, force = FALSE, INSTALL_opts = c('--no-lock') ) install.packages( "caret", lib = lib_r_packages, dependencies = TRUE, force = FALSE, INSTALL_opts = c('--no-lock') )이제 이 설치 코드를 실행하는 slurm job script를 3번 항목을 참고해 생성한 다음
sbatch로 실행합니다.
2. R 코드 작성
클러스터에서 실행할 R 코드를 local에서 작성합니다. 코드가 문제 없이 실행되는지 먼저 local에서 확인합니다. 그 후 실제로 실행할 코드를 작성하여 클러스터의 user home directory에 옮기거나, Visual Studio Code내에서 작성하여 저장합니다.
아래의 샘플 코드는 xgboost와 caret을 개인 디렉토리에 설치 및 로드하고 learning과 prediction을 수행한 다음 prediction 결과 plot을 jpeg로 저장하는 코드입니다. library(xgboost, lib.loc = lib_r_packages) 에서 lib.loc 옵션이 개인 디렉토리에 설치된 패키지를 로드하는 옵션입니다.
Batch script를 작성할 때는 알고리즘의 output이 자동으로 저장되지 않으므로 파일로 결과를 저장하는 코드를 포함하는 것이 좋습니다. 아래 코드를 R_test_cpu.R로 저장하여 user home directory에 둡니다.
|
|
2. 현재 클러스터 자원 사용량 확인
아래 커맨드를 통해 cpu-compute 노드의 cpu와 RAM 사용 현황을 볼 수 있습니다.
|
|
아래와 같은 결과가 나옵니다.
- CPUS의 A/I/O/T는 allocated/idle/other/total을 의미합니다.
- 자신의 job이 바로 실행되기를 원한다면, Slurm batch script를 작성할 때
- RAM 용량을 FREE_MEM보다 적게 설정해야 합니다.
- CPU 코어 개수를 CPUS idle보다 적게 설정해야 합니다.
- 현재 가용 자원보다 더 많은 자원을 요구하는 script를 작성하면, job이 바로 실행되지 않습니다. 대기 상태에 있다가 다른 사용자들의 job이 끝나고 자원이 반환되면 job이 실행됩니다.
3. Slurm batch script 작성
작성한 코드를 cpu-compute node에서 실행하는 Slurm batch script를 작성합니다. 클러스터 소개 페이지의 slurm job configurator를 사용하면 script를 쉽게 작성할 수 있습니다.
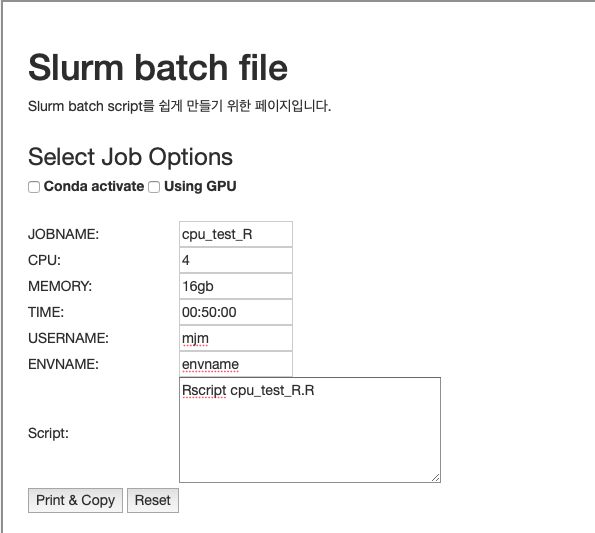
Python과 달리 conda environment를 사용하지 않으므로, conda activate에 체크하지 않습니다.- 빈칸들을 채웁니다.
- Script란에 Rscript xxx.R라고 작성합니다. 이는 home directory에 있는 xxx.R 파일을
R로 실행하라는 의미입니다. Job script를 작성하거나 sbatch 명령어를 사용할 때, visual studio code의 explorer에서 파일명을 마우스 우클릭하고 경로 복사를 사용하면 편리합니다. - Print & Copy 버튼을 누르면 내용이 클립보드에 복사됩니다.
R_test_cpu.job이라는 이름으로 클러스터의 user home directory에 저장합니다.
Configurator로 생성한 Slurm batch script의 내용은 아래와 같습니다.
|
|
Script 윗부분의 #SBATCH 옵션들의 의미는 다음과 같습니다.
- —job-name: 수행할 작업의 이름
- —mem: memory limit
- —nodelist: 작업할 노드의 이름
- —ntasks: 작업의 수
- —cpus-per-task: 각 작업에서 사용할 cpu 코어의 수
- —time: 작업 제한시간
- —account: 해당 작업을 수행하는 계정의 이름
- —partition: group of nodes with specific characteristics
- –nodelist: 사용할 node의 이름
- —output: 코드 실행 결과 log 파일. 확장자는 out이나 log가 가능합니다.
- —error: 코드 실행 결과 log
sbatch에 대한 더 자세한 정보는 Slurm 공식 웹페이지를 참조하세요.
4. Slurm batch script 실행
sbatch 커맨드를 통해 job을 제출합니다. 2번 문서의 Step 4에서처럼, ctrl+shift+~를 눌러 터미널을 여러 개 띄우고 smap -i로 작업 현황을 확인하고, tail -f xxx.out, tail -f xxx.err으로 콘솔 출력이나 error를 확인합니다. 작업은 5분 이내에 끝납니다.
|
|